

A garage door that won’t close all the way can feel like a small issue until it leaves a visible gap, bounces back open, or refuses to move past a certain point. The good news is many causes are straightforward to identify. Before you assume the opener is dying, check how the door behaves and look for patterns. This guide explains what the symptoms often mean and how to work through safe, practical checks. You will learn how photo eyes, travel limits, rollers, tracks, springs, and even sunlight or LED bulbs can affect closing. Along the way, you will also see where the line falls between DIY inspection and problems that call for a trained garage door technician.
1.What “stops short” tells you about the problem.
The way your door behaves points to likely culprits. If it starts down, hesitates a few inches from the floor, and then reverses with the opener light blinking, the safety sensors probably lost their beam. If it chatters or hums near the bottom but does not reverse, a binding roller or crooked track may be adding friction the opener cannot overcome. A door that touches the floor, compresses the bottom seal, and then rises back up a foot often needs a close limit adjustment. A persistent daylight gap at one corner suggests an unlevel floor, a crushed astragal (bottom seal), or a misaligned track.
If the pattern suggests a mechanical issue you are not equipped to address, bringing in a local technician protects both the door and the opener. Companies like Welborn Garage Door Repair of McKinney regularly evaluate track alignment, spring balance, and opener settings as a system, which helps prevent repeat failures after a quick fix.
2.Rule out easy blocks: sensors, sun, and simple obstructions.
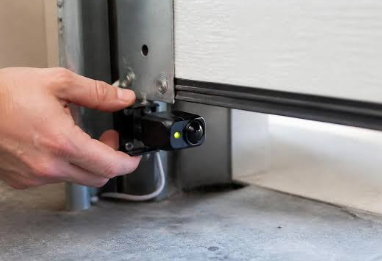
Start with the photo eyes at the bottom of the vertical tracks. Each sensor should have a steady LED when the beam is aligned. Wipe both lenses with a soft cloth, make sure the brackets are not twisted, and confirm the wires are intact at the terminals. Morning or late afternoon sun can flood one sensor and make it think the beam is broken. A small shade made from a scrap of cardboard over the sensor hood can confirm glare is the cause. Also check for spider webs, leaves, or a broom resting in the beam’s path; even thin debris can interrupt it.
Next, rule out control issues. Make sure the wall control is not in “Lock” mode, which turns off remotes on many openers. Replace the remote battery and try the wall button to see if behavior changes. Some LED bulbs create radio frequency noise that interferes with certain remotes; swap to LEDs rated for garage door openers if the door only misbehaves with wireless controls. Finally, verify the opener’s outlet has power and that the GFCI in the garage or adjacent area isn’t tripped, which can cause intermittent resets and odd behavior.
3.When mechanics get in the way: tracks, rollers, and springs
Friction near the floor often traces back to track alignment. Stand inside the garage and sight down each vertical track to see if it bows or pinches. The rollers should run centered in the track, not scraping a flange. Check that jamb brackets are tight with lag screws into solid framing and that the horizontal tracks above are level and supported. Look for a dented section, a loose splice, or a bolt protruding into the roller path. Flat-spotted nylon rollers, wobbly steel rollers, or a bent hinge can all make the door catch near the bottom panel.
Test door balance with the opener disconnected using the red emergency release cord. Lift the door by hand to mid-height. A properly tensioned torsion or extension spring system should let it hover without racing up or slamming down. If the door is heavy, drops hard, or shoots upward, spring tension is off. Do not loosen set screws on torsion springs or touch cable drums; those parts are under high torque. A frayed cable near the bottom bracket or a drum with wraps out of place means you should stop using the door and call a technician, since operating the opener against an unbalanced or damaged counterbalance can bend the top panel or strip the opener’s drive gear.
4.Opener settings that matter: travel limits and force
Opener travel limits control how far the trolley moves before stopping. On most chain-drive and belt-drive units, close limit and open limit adjustments are dials or screws on the motor head. If the door reaches the floor and immediately reverses, nudge the close limit in small increments so the motor stops just as the bottom seal contacts the slab. Test after each tweak and perform a reversal test with a 2×4 under the door to verify the safety system still trips properly. Screw drive and some DC openers have electronic programming instead of dials; follow the manual’s learn sequence to reset travel.
Force settings are the opener’s sensitivity to resistance. Raising the close force can help after a temperature swing changes rail friction or the bottom seal stiffens in cold weather, but it won’t fix a binding track or a weak spring. Too much cranking force masks real problems and can make the system unsafe. As a rule, adjust travel first, then make minimal force changes only if the door is balanced and the tracks are true. Seasonal weather can expand steel rails and compress vinyl seals, so a small travel tweak after a heat wave is common. If the door still stops short, revisit the mechanical checks before increasing force.
When to stop and call a pro safely
Certain red flags mean you should pause DIY work. A visible gap in a torsion spring, a cable off its drum, a bent shaft above the door, or a panel that has creased from a previous bind all indicate repairs that require specialized tools and practical knowledge. Continuing to run the opener against those faults can kink the tracks, deform the top strut, or damage the logic board. Until a technician arrives, leave the door down if it is safe to do so, unplug the opener, and avoid pulling the emergency release on a door that feels heavy, since it may fall.
Once your door is closing reliably again, build a simple routine to prevent another “stops short” episode. Every few months, wipe the tracks and rollers clean, but do not lubricate the tracks. Instead, apply a small amount of garage door lubricant to hinges and roller bearings, check that photo eyes stay aligned and clean, and inspect the bottom seal for tears or a flattened ridge. Test balance with the emergency release and confirm the opener’s reversal works using a 2×4. Keep the door and opener model numbers handy, along with notes on what you observed, so a technician can diagnose issues faster if new symptoms appear.
